Part One of the Liquid Roof Adventure
Liquid RV Roof by EPDM Coatings. My order consisted of one Liquid Roof -5 Gallon Pail and three Liquid Roof Gallon Kits. Each Gallon Kit included 1 Gallon Liquid Roof, 1 mixer , a 10 foot roll of polyester fabric and a 2-1/2 inch bristle brush.
My original order from EPDM Coatings was in March of 2016, but I injured my back and was unable to do the job as I intended so in May of 2016 I inquired and was told the shelf life was five (5) years. Much of the year in Florida the temperature prohibits older folks like me from working on the roof, as does various medications I take.
This is a picture of my stash safely stored in the "Man Room" until I can get to it.
It is now December, 2017 and we have almost finished prepping the roof of the fifth wheel for the Liquid Roof. Any cuts in the roof have been patched with an EPDM tape and caulked with Dicor Self Leveling Sealant.
In this picture the AC Unit has been removed to replace the gasket underneath it and to ensure that the roof membrane is OK.
At the bottom of the picture you can see Dicor Self Leveling Sealant around the tape surrounding a roof vent and the refrigeration vent. the plastic on the roof for every vent was replaced except the ones normally kept under the large vent covers.
My son Ryan and my camping buddy Reed were instrumental in getting this done.
In this picture I am scrubbing years worth of grime off the roof that was under the AC unit.
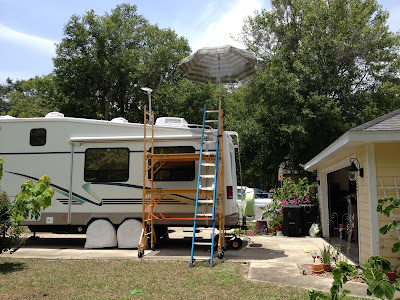
Here is my lifesaver, scaffolding from Northern Tool, I have two sections plus outriggers that I use to get onto the roof. Depending on the sun's position, the umbrella helps keep the sun of you as you work.
This picture demonstrates how the seal between the fiberglass end cap and the EPDM roof were sealed prior to using the Liquid Roof.
Dicor Self leveling Sealant was used around each patch
Prior to the patch, each screw holding the rail was removed and replaced with stainless steel screws and firmly tightened in place.
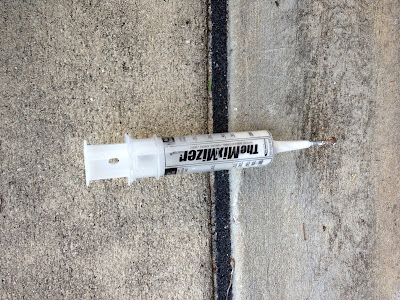
This is a tool that I fashioned that allows me to place Dicor Self Leveling Sealant with one hand. It originally was sold in Walmart to allow mixing gas and oil for two cycle engines. You have to smooth the syringe inner seal and widen the exit hole a little for easier operation.
For larger caulking jobs I use a Ryobi 18 volt One Plus unit shown here without the battery.
The roof is looking good. Every time I wash it more of the white is rinsed off.
More patching to ensure the joint between the EPDM roof and the forward fiberglass shell does not leak.
Another roof view.
ALEA IACTA EST
The Die is Cast!
Probably the only thing I remember from my high school Latin classes. But I was thinking that as I opened my first can of Liquid Roof to mix in the catalyst.
And it sure was, the stuff had set up in the unopened can and was of no use. And at $90 a gallon I might add!
I was reminded of a picture I remembered of natives making a rubber ball of liquid latex over a fire on some remote rubber plantation.
Instant panic.
What was on the cover was barely tacky.
When I tilted the can it would not pour but flowed ever so very slowly towards the down side of the can.
All those hours of prep and NO Liquid Rubber.
Once I got myself under control and got every thing cleaned up, I sent an e-mail to EPDM coatings and received a fairly prompt reply.
There was an anxious moment when the person who I communicated with told me the shelf life of the product was only one year. But when I said I had an e-mail from his company that said the shelf life was five years he asked me to forward it to him which I did.
Later he came back and asked me to open the other cans, but I was out of town and as soon as I arrived home a replacement shipment arrived so I never did open them.
The Saga Continues, Part Two of the Liquid Roof Adventure
While the replacement Liquid Roof arrived fairly quickly, my assistant was no longer available. During the roughly two months it took for everyone's schedule to work out, the roof became filthy and in need of another wash and rinse before any painting could be accomplished.
The situation also had at least one good point. The Dicor Self Leveling Sealant that was so very fresh in December now had two months to age and it was a lot firmer.
It was decided that rather than remove the AC unit and paint the area under it; we would loosen the screws that hold it in place, lift the unit and hold it up with 2X4 blocks so a paint roller would fit underneath and we would not be trying to align the AC unit over wet Liquid Roof.
The day before my helper arrived, I washed the roof again with a Flow Thru Extendable Brush that allowed me to wash the roof from the scaffolding without getting on the wet roof.
However, my money (about $20) was wasted with that brush. The connection between the brush and the hose was not made strong enough and it was destroyed by the weight of the hose at about the 90% completed mark. Some ideas work, some don't.
Finally, we are ready to do the roof. My partner Reed is taping the roof edges to keep the Liquid Roof on the roof and not the side of the camper. At this point, we only had to tape a line down each side and across the fiberglass at each end; everything inside that area gets painted. All taping and final preps were done the day before the actual painting.
I don't have any photos of the actual painting, Liquid RV Roof has a catalyst that you mix into
I spent a lot of time reading the questions asked on EPDM Coatings site and found it somewhat confusing. many comments appeared to relate more to building roofs than RV roofs. There were no specific directions on how to lay a 30 mil coat rather than a 20 mil coat. But in the notes I read about dividing up the areas for coverage that would meet the 10 year warranty.
This is my drawing of the roof (without cutouts such as vents and AC units), I took the length and width of the area I wanted to cover and divided it into equal sections of 3.5 feet long and 8 foot wide. We tried to spread one gallon of Liquid RV Roof for every 30 (3.5 X * equals 30) square feet of roof and we had 8 gallons of material to use. Which one note said would give 30 mil coverage.
One problem we an into was getting the Venturi effect in the paint can when mixing the catalyst. A half inch drill was recommended to enable this effect to take place which would create a Venturi effect in the can allowing you to pour the catalyst into instead of on to the paint in the can.
No matter what speed I used on the 1/2 inch drill, I could not really get the Venturi effect demonstrated in the videos shown on the EPDM Coatings website.
There was also confusing info on how many minutes the paint needed to be stirred to be thoroughly mixed. Bear in mind that your working time starts when the catalyst hits the paint in the can and that time is an unknown variable based on ambient temperature.
This shows the leading edge of the Liquid Rubber Roof after the painters tape was removed.
A close up of the covered EPDM tape and Dicor Self-leveling Sealant covering the seam between the EPDM roof and the fiberglass nose cap.
A look at the forward edge of the roof. Ripples are starting to form in the roof, particularly along the lower side of the picture, The ripples are caused by interactions between the EPDM roof and the Liquid Rubber Roof just applied.
Looking to the rear from the right forward corner of the RV.
Another shot of the roof looking to the rear. The painter's tape has not been completely removed yet.
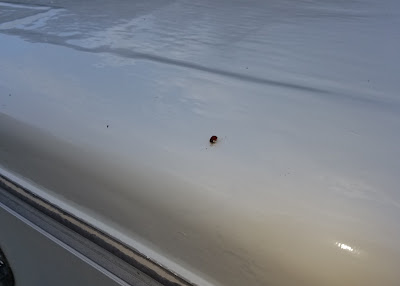
The finish time was about 5:30 PM and suddenly Blind Mosquitoes and Lady Bugs were every where. This a Lady Bug who has made it's last flight.
The day after painting, the black spots all over the roof are bugs that landed on the fresh paint.
Another day after painting , a view of some of the reaction between the EPDM roof and the Liquid RV Roof.
Still another view.
A closeup showing bugs caught in the paint, however they seem to be disintegrating. There were also hairs in the paint from the brushes provided in the Gallon Liquid RV Roof kits. I suggest you get good quality 2 1/2 inch brushes that do not shed bristles.
In the next photo, the surface of the paint after drying is dimpled similar to a golf ball. i can not be sure, but I believe it was caused by the device I used to create the Venturi effect when mixing the paint.
It turns out that my mixing device is made for mixing mortar in a five gallon can. I believe that my efforts to create the Venturi effect to mix the catalyst put a lot of tiny air bubbles in the paint and as the paint hardened, the dimples formed.
I believe that a paint mixer like this.
Would have formed the Venturi effect without adding air to the paint. Or at least that is my theory.
Another point of interest is shown here. Along the seams is a small amount of a yellow substance that I noticed in various places on the roof. It appeared as the paint hardened. I don't know if that is natural or not.
Perhaps a better view of the yellowish substance noted as the Liquid RV Roof hardened.
More yellow substance, after a couple days it seemed to brush off.
Overall, most of the reaction buckling caused by the Liquid RV Roof acting with the base EPDM roof seems to have gone down.
The golf ball finish seems to be a permanent part of the roof but the Roof has been covered. I may or may not roll my last gallon of Liquid RV Roof over that area in the future.
This shows some of the bubbling that remains. A week later.
A broad view looking to the rear.
Another broad view looking across the forward end.
The next two pictures, show what you can see from the ground which is basically the endcap joints fore and aft on either side.


