A quick peek on the roof of the Titanium revealed three vent covers without caps. Unfortunately when I bought it in May I also took a cursory look on the roof. I am not a fan of height and really dislike being on the roof. I am not chicken, just very, very cautious.

It took me awhile to figure out these were sewer system vents so I figured it may not be to serious if the covers were missing. But as I thought about it, I realized I had to go onto the roof to see what the situation was.
Not good, the closest one had a major hole in the base plate which would allow water in. I have seen no sign of water on the inside but I did not want to take any chances.

Once I decided I had to do it, I found two videos that reviewed how to replace sewer vents on the roof.
I elected to go with Camco Cyclone Sewer Vents because their information said the plastic was UV protected and would last longer. My rig is a 2002 and the original plastic vent bases were in poor shape.

I also picked up some knee pads from WalMart that had a neoprene type cover on them that I thought would slip less than the hard-shelled knee pads I already owned. I really don't want NO SLIPPING or SLIDING on the roof.
The new ones are on the left, my rifle range ones are on the right. I thought the hard plastic shell on the range knee pads might slip on the roof.

I thought the neoprene pad on the outside of the new ones might not slip.

However, these are a little larger and seem to wrap around the knee better.

Close-up.
As you can see from my picture above, I brought everything they mentioned in the videos and everything I could think of to the roof with me.

Well it wasn't enough.

The screws holding the base plate onto the roof were square drive screws. That initiated a trip down and back up. Luckily I found the correct size bit in the garage.

Be very careful when sliding the scraper under the base of the vent particularly with a "rubber" roof. There were two types of sealant around my base plates, The outer sealant appeared to be Dicor Self Leveling LAP sealant. Inside there was a very sticky navy gray sealant that was very hard to get through.

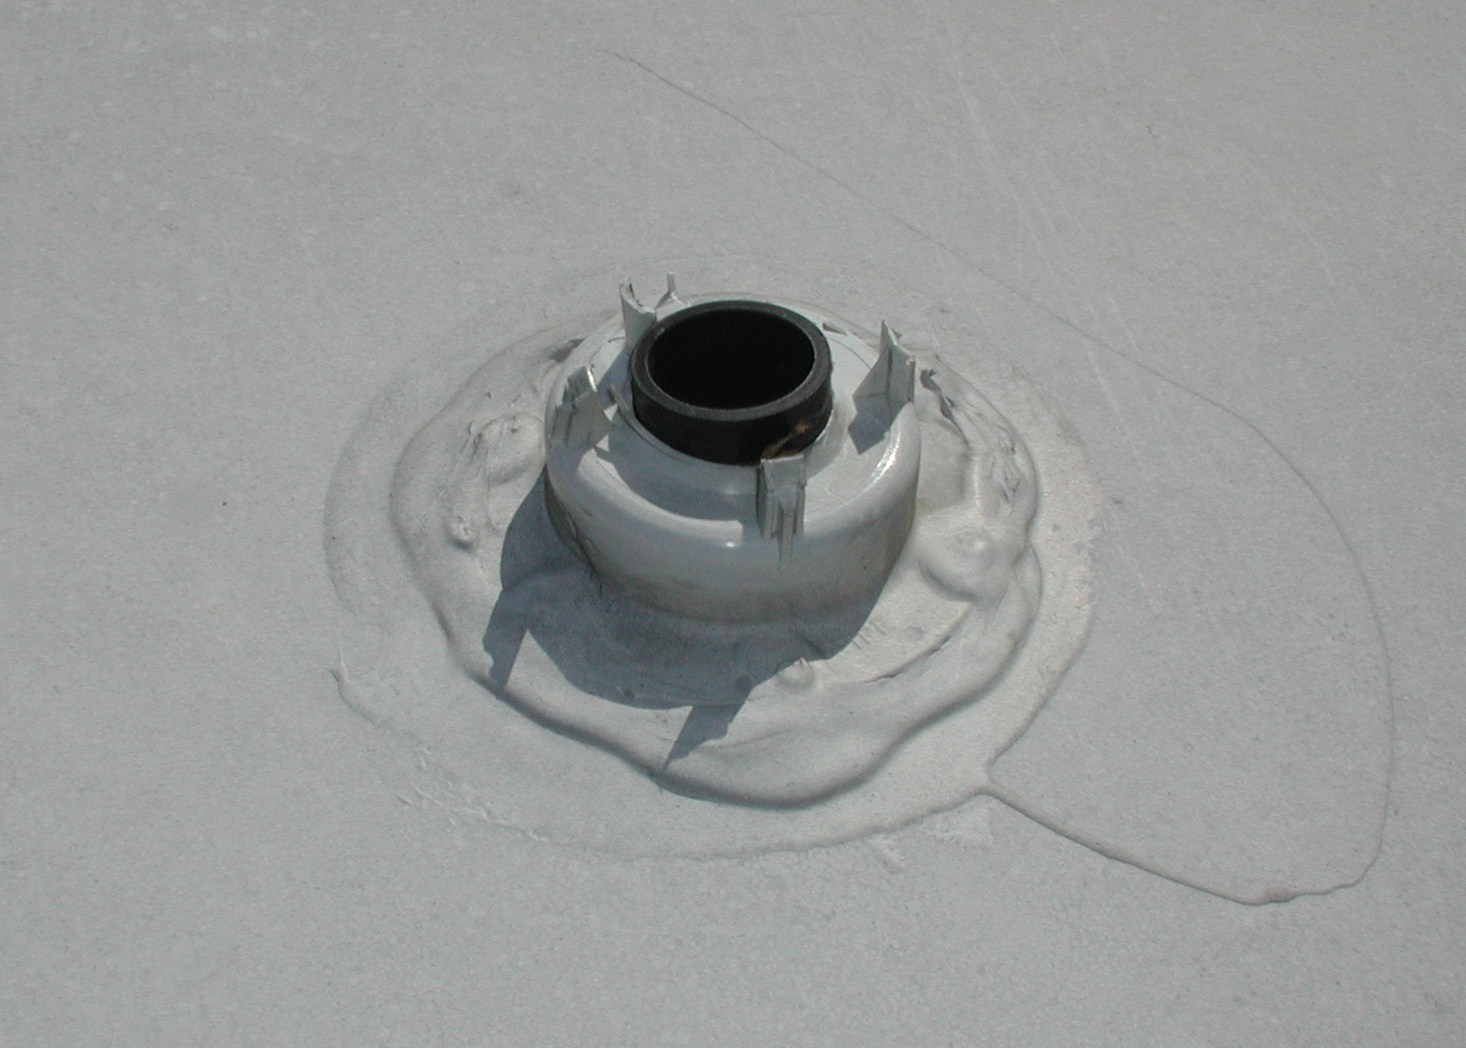
If you look at the base plate from the removed vent, you can see the plastic has a large break in it. All three of the base plates were allowing water through them. They either had a hole or were broken due to sun damage & age.
If you look closely at the vent pipe you will see that it is not sealed to the roof. Therefore, when the sealed base plate broke, water is allowed inside the base plate.
If you are thinking of installing a new cover or Cyclone vent over an old base plate you may want to consider the age and condition of the base plate.
Before installing,
DAMPEN a rag with mineral spirits and clean the area where you will apply Dicor Self-Leveling Lap Sealant. Allow it to dry thoroughly before applying Dicor.
MINERAL SPIRITS CAN DAMAGE A "RUBBER" ROOF. MAKE SURE YOU DO NOT SPILL IT ON THE ROOF. SPECIFICALLY CHECK CAUTIONS ON MINERAL SPIRITS.The installation involves dropping the base over the vent pipe, setting the Cyclone Vent over the pipe, raising the base and drilling a hole into the bottom of the cyclone vent. Once the hole is drilled a small screw holds the Cyclone Vent in place on the vent pipe(A PIECE OF TAPE WOULD HAVE BEEN VERY HANDY FOR THESE STEPS.
Once one screw is in place the instructions call for two more. Make sure the Cyclone Vent spins in place.
With the base plate held up, put Dicor Self-Leveling Lap Sealant on the three screws, and all around the base of the vent pipe (all the way out to the end of the base). place the base down firmly. Place Dicor Self-Leveling Lap Sealant around the seam between the base plate seam and the upright of the Cyclone Vent. Then continue applying sealant until the base plate is covered. Run the sealant out until you exceed the old sealant line.
At http://www.youtube.com/watch?v=zPvldWvC16g there is a video showing the installation of the Cyclone Vent. The fellow installing it is standing on the ground installing it on an old piece of roof.
You will be on your knees, working one inch off the deck, 11-12 feet in the air. Be careful.

The first one completed.

Completed. It looks like a small flock of birds up there.
 It takes awhile to get her ready, but here I am ready to roll.
  Sailor is in the truck, also ready to roll. She is keeping a close eye on Mom who is taking the picture.
 It seems that before I cleared my street, I had wiped off the two vents shown on the right side of this picture. However, the two vent covers laid on the roof between the large vent on the left and the rectangular vent on the lower right. The trip lasted about 2 1/2 hours at about 55-60 mph with various stops and turns.
 First nights dinner, shrimp and salad. Excellent taste and low carb!
 This is a view from across the swimming hole. The Roaming Elks (our group) make up the units shown. We had 13 rigs assemble for this gathering.
 The camp store, which had a few items and was closer than Walmart.
 The North side of the campground.
 A view of the swimming hole. It is fed by a large aresian well.